Sunday, November 1, 2015

All Saints' Day!

Celebrating All Saints' Day!

I love this day.  We celebrate with saints both living and dead the faith that we all so love.  What a wonderful scene that makes.  My husband preached on All Saints' Day this morning and he talked about a church that someone had attended where members of the congregation would call out a name and the whole assembly would respond, "Present!".  After this happened several times, the person who was a newcomer to this church realized that they were calling out the names of people who were no longer among the living, but those who have passed to the other side.

Halloween, or "All Hallow's Eve!", started as the beginning of this Christian celebration of saints both living and dead.  And, like so many things that Christians have assimilated into our traditions, the pagan tradition of Halloween which grew out of this has become a part of our children's childhood.  On Halloween, the little ghosts and goblins go out to scare away evil spirits.  All children know about Halloween, but they should also know about the Celebration of the day afterwards, All Saints' Day, when we commune with our brothers and sisters who have gone ahead of us in the faith.

So, we made our Saint Crowns...


 On the line beneath the picture of the children holding hands, write the name of the child who is making the crown.

You could easily draw pictures of children holding hands, but I found just the picture I wanted at this site:
http://www.bing.com/images/search?q=picture+of+children+holding+hands&view=detailv2&&id=A20A1002811F6CF0E732399B79D652316BC58109&selectedIndex=131&ccid=k7No7YBT&simid=608047819454877602&thid=OIP.M93b368ed80531d747a7d20ffff9574b1o0&ajaxhist=0


This is all you need for this craft.  The crown and some extra card stock to help make the crown.


Put Your Best Face Forward- Ephesians 5:1-2 Imitators of Christ

Put Your Best Face Forward

Be Imitators of Christ

Ephesians 5:1-2

Ephesians 5:1-2 Therefore, be imitators of God, as beloved children, and walk in love, just as Christ also loved you and gave Himself up for us, an offering and a sacrifice to God as a fragrant aroma.

Everything about that Scripture verse speaks to me.  Be like Christ... as a beloved child of God... walk in love... just as Christ loved you and gave Himself up for you...
And this wonderful sacrifice was like a fragrant aroma drifting up to the nostrils of God.

I just love it.  I saw this wonderful Halloween craft on Red Ted Art, where they made little monsters and had games to see who could huff and puff and blow into the straw and make their monster travel the farthest.  So, that gave me this idea.

  I printed off pieces of paper with one side just a blank face that the kids could fill in and on the other side, our Scripture verse, Ephesians 5:1-2.  I collected large sturdy straws.

First, I cut out slips of paper just a little bit bigger than the straw and twirled it around the straw.  Cut the paper just a little larger, loosen it so that it won't "stick" when they kids are trying to blow into the straw and then hot glue it down.


 This was a fun craft and I think the kids enjoyed the message as well.  Put Your Best Face Forward... Be imitators of Christ!

Enjoy!
 

Tuesday, October 20, 2015

"I'm Not Afraid" Pumpkin


"I'm Not Afraid" Pumpkin

I was thinking that with Halloween coming, I needed to do a lesson having to do with scary things.

So, I thought we would make Halloween pumpkins that have Scripture verses all over them that remind us that we don't need to be afraid, because God is always with us.


I took orange construction paper.  Because construction paper is bigger than the average print paper, it won't fit in your printer.  So, I trimmed them to the size of regular copy paper.

Then, print off these different "leaves" of the pumpkin.  You will end up with 8 sections to the pumpking.  Fold them with the Scripture verses toward the inside.  

Have the children use a glue stick to glue the sections together and then put a little hot glue in the middle at the top to help stablize your pumpkin and add the stem.  

I made a curly stem, but if you'd like to save a little time, you can just put straight stems in.  It took me about an hour to cut out all the pieces to make 10 pumpkins.  Remember, you'll be adding stems from green construction paper later, so just cut the pumpkins out without the stems. 

 As always, these are jpeg files, so if you can pull them off this site and put them in your photos, then you can then pull them onto your own print shop software and print them off.


 Ella and Parker loved putting this craft together.  And, I hope we all learned more about how God is with us at all times, even during the scary times.
 

Saturday, October 17, 2015

Jesus is the Light of the World


Jesus is the Light of the World Lantern

The finished product! 


 All the kids loved this project.  Jesus is the Light of the World.  Really... That's what Christianity is all about, isn't it?  If my Sunday School kids learn nothing more than that, then they are wealthy indeed!

I found this wonderful picture of Jesus standing on top of the world.  I added the worlds.  All you need for this project is:
110 pound card stock
regular typing paper
printer
little battery operated votive candle (I got 10 for $5)
Color crayons or watercolor markers
Hot glue

Print the picture.  I tried parchment paper and wax paper and couldn't get the picture to take on the paper, and the watercolor markers beaded up, so I ended up using regular paper and it did well.


I haven't figured out how to insert pdf files into my blog.  Sorry.  : (
Hope you can pull this picture off this blog and then pull it into your own desktop print shop software and print it.  Hot glue them together after the kids color the picture.

Cut pieces of card stock for the top and bottom edges, a handle and a circle for the bottom. 
I went ahead and hot glued the card stock to the top and bottom before bringing it to class.

Enjoy!

All of our pretty lanterns sitting in a row!


Little Eliza Jane, the youngest of our class, hands me her finished lantern.

Hannah and her lantern.

Fun times fixing our Jesus is the Light of the World lanterns

Haley and her beautiful smile.

Ella loves her lantern.


Sunday, July 19, 2015

VBS - Fruit of the Spirit Crafts


Vacation Bible School

Fruit of the Spirit

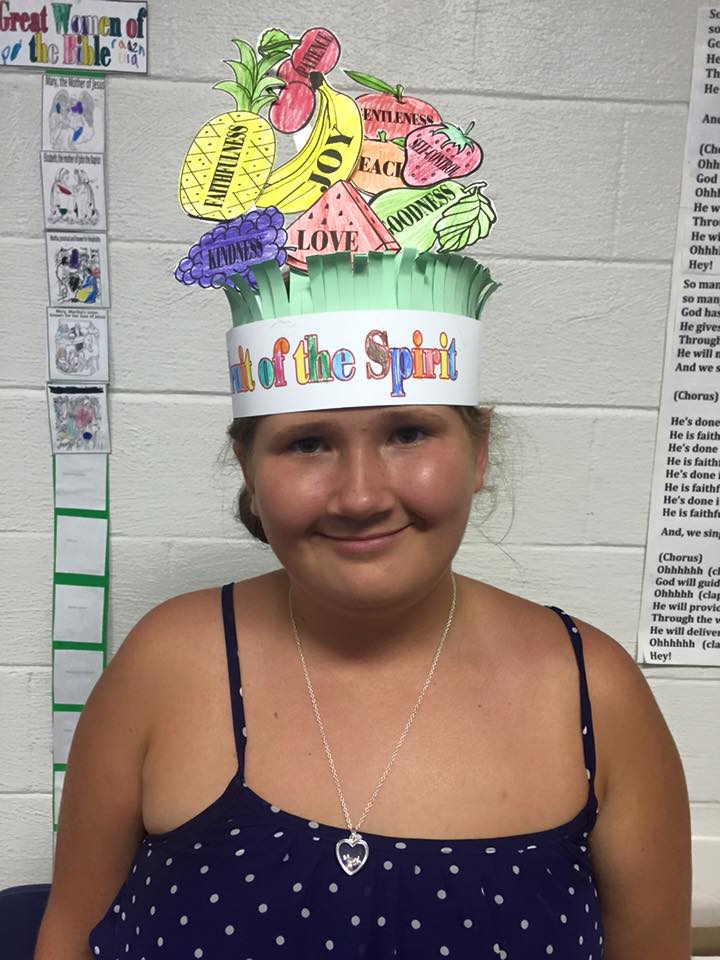
This year we did a Fruit of the Spirit theme for Vacation Bible School.  I had the task of coming up with three crafts for our three-night event.  I'm going to show you the crafts we did and tell you how you can do them better.
First night, we did a Fruit of the Spirit Crown:

This was a big hit!  I printed off the fruit on card stock and while watching TV at night, I'd cut out all those fruit.  Also, cut green paper so that it looked like grass and made the banner.


Here's the fruit.  You'll need one card stock print for each child.  I always try to print off extra in case more kids show up than I expected.  I still haven't figured out how to embed a pdf file into my blog.  Sorry. But hopefully you can drag this to your desktop and put it in your photo album to print.  Like I said, I sat night after night cutting out fruit for this project.  It's time-intensive, but a great craft!

The headband for the crown.  I also cut out plain pieces of card stock to hot glue to these headbands to customize to each child's head.


Sweet Kadie shows her masterpiece!


Way to go, Hannah!  What a beautiful crown.


 One thing I realized from doing this craft is that you need to have all the components hot-glued onto the headband before the kids start coloring them.  We had only 20 minutes for crafts and it took all three nights to finish up this craft.  You don't have to have the fruit in exactly the same position.  It makes each one individual for there to be some differences.  So, cut out the pieces and hot glue them together. Then the kids can come in and just color and have the crown customized to their heads.  That way, they'll be able to take their crafts home that night.
Reese coloring her Fruit of the Spirit craft.

 
My littlest crafter for the week, Eliza.  Great coloring, Eliza!

So, if I had it to do over again, I'd go ahead and hot glue the fruit onto the headband, so that the kids could just come in and color the pieces.  Then, the craft would have been completed the first night.  More time-intensive prior to VBS, but much less stressful the night of.  I just cut out different lengths of card stock to attach the fruit to the headband.  


The second night we did this very easy craft.  The kids were able to complete it that night.  I found this wonderful print at the url address printed in the caption above.  I printed them off on card stock and then found some glow-in-the-dark paint.  I painted each dove with the glow-in-the-dark paint and let them dry prior to VBS.  I took a small hole punch and strung fishing wire at the top for a hanger. 

One thing nice about this craft is that it gave the kids a chance to show their own individuality.  

The third night we made Fruit of the Spirit charm bracelets.  The kids LOVED them!  Still yet another time-intensive craft prior to VBS, but so well worth the time and effort.

https://www.etsy.com/listing/44892492/100pcs-tiny-fruit-salad-charms-wee?ga_order=most_relevant&ga_search_type=all&ga_view_type=gallery&ga_search_query=plastic%20fruit%20charms&ref=sr_gallery_9

I found these wonderful inexpensive plastic charms from Etsy.  I got two packages.  There are about 100 charms in a bag for about $7.  I divided them up into the individual packs for each child, including a piece of small gauge wire that would fit through the holes.  These look big in this picture, but they're really small.  Also, I included little 4mm silver balls as spacers and toggle clasps to attach the bracelet to the child's wrist.


I took paper plates and attached folded over painter's tape, then placed the spacers and fruit charms on them to make it easy for the children to pick up the items without everything rolling all over the floor. And, PRAISE GOD!, it worked.  I was really impressed at how well the children were able to string these little silver balls and charms onto the small gauge wire.  Only the smallest of children needed help.  And, at the end I twisted the wires around the toggles to hold in place.  Be sure to attach one toggle to one of the wire prior to the kids stringing the beads.  Before they begin stringing their beads, place the wire around their wrists and allow just enough at the end to make the bracelet easy to move around the wrist and enough wire to tie off the other toggle.

Mason loved his Fruit of the Spirit bracelet.


Fruit of the Spirit POWER!


Everyone LOVED this craft.  And, it really did come out pretty.  Well worth the time and effort doing it.

 I love seeing these smiling faces!
Add caption
Enjoy!  I hope I have helped someone else prepare for a Fruit of the Spirit Craft time at Sunday School or Vacation Bible School

Sunday, May 24, 2015

The Parable of the Widow's Mite


The Parable of the Widow's Mite


I love this story.  I love the true story of little Hattie who gave all she had, and the Lord multiplied it immensely to the good of His Church.  God is good... all the time!     

If you can upload this picture onto your computer and then print it off on one sheet.  I printed it on sturdy construction paper, beige color so that it can then be colored.

I took Pringle containers that we got at Costco and cut out the top a slit for money to be inserted. 
Have the kids color their pages, then we hot glued them onto the containers.  Now, the children can take them home and save money for church.  A wonderful way to encourage children to give to the Lord!